Monday, May 30, 2011

Staging Homes and Weddings

Just over a week ago I got to go to Utah to visit my family and help my mom stage a couple houses she is selling up there. It was so nice to see my beautiful family. I love them so much and have really missed them since I have been gone. But enough about that. As I left for Utah waiting in the beautiful LAX airport :) it dawned on me that staging a home is very similar to decorating/staging for a wedding. So I will share with you a few tips that you can use whether you are planning your wedding or getting ready to sell your home.

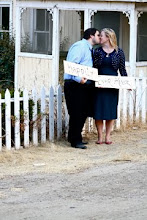
These are the two houses.....aren't they gorgeous? hahahaha...not yet

Tip #1 Location, Location Location..
If you find a house in a great area but looks ugly as all get out then you are going to get a better deal and you can make the outside even better with some plants and a little TLC. Same goes for your venue. If the location is great for your guests and it needs a little sprucing...PERFECT. You are going to get a better deal on the price and it will be more your own.
Tip #2 Less is More
The pictures are before and after shots. As you can see it didn't take a lot to define this area as the dining room. The best part is we bought that table for $100 with eight chairs (which we didn't use for this house) and instead got some nice leather chairs at Overstock warehouse sale for $70 for the pair. The centerpieces were a combination of tins from ikea and flowers from Tai Pan Trading. With just these few pieces we were able to define the space and make it look beautiful. With a wedding you need just enough to be able to define the feel and style you are going for without overwhelming your guests. If you are wanting a vintage theme (like me :)) you just need enough vintage items for the guests to feel as though they are in a different time period. Be sure to not put so much that it looks cluttered.

Tip #3 Pick a Theme and Stick with It
It is important that as you stage a home that you pick the style you are going with and stick to it. The color scheme throughout the house will help give it flow. The flow is what makes people feel comfortable and feel like it could be their house one day. Think about the model homes you have been in. The reason people love them is because the style stays the same throughout and it tells your subconscious, "This is a nice place".  With your wedding style you want to do the same thing. From the rehearsal through to the end of the reception you want to keep a style that will help your guests feel what you as a couple are all about. My fiance always says that we would have been so happy in the 1950's (not that we aren't happy now). We like things simple and quaint. So we are planning a vintage wedding from simple decorations, an old bread box for the rolls, a wooden toolbox to hold silverware and napkins. It just needs to flow and keep the same style throughout.

I have some great projects and ideas I am working on this week so check back soon for more ideas and tutorials for your wedding and life in general!


Emily

Wednesday, May 25, 2011

My New Obsession....Globe Strand Lights

Ok....so I'm not sure that is the correct name for these but I am obsessed with these

Thank you to Pottery Barn for these great images


I absolutely love the ambiance and feel they add to any party and especially what they will do for my wedding. Now I am on the hunt to find them for a little bit better price than I have found so far. This is the best part of being a bargainista! I am going to wait and hunt until I find them for a price that fits into my budget. I know I can find them for less if I am patient. Time is a big factor is saving money on any project. It's when you are in a time crunch that you have to spend what the going price is on the open market. If you have some time you can usually find things for less than they first appear. So give yourself time and you will find a great deal!!

On another note. I know I promised pictures of the staging project in Utah. I have been pretty sick the last week since I got back. But I am feeling better and will create a good long blog with lots of tips for staging that can help you on any home decorating project in the next few days! For now I am off to bed...have to be up in 4.5 hours for my wonderful fiance's graduation! So proud of him!!

Tuesday, May 17, 2011

Just a Quick Tip

Found a fantastic store today! (ok I didn't find it...my mom introduced it to me) If you like to find great deals on doors and things for your house projects and you like donating to a good cause checkout a Habitat Store in your area. The money spent there is used to help fund the Habitat for Humanity Organization in building homes for the less fortunate. It is a great cause and I found some fabulous deals!!

Have a great week my friends!!

Sunday, May 15, 2011

The Chair of My Dreams

So this is a project I worked on when I first got to California and haven't had the time to blog about yet! I saw this wedding show once where instead of boring old chairs they had mix and match old vintage chairs and benches. The wedding was in this open field lined with big oak trees. It looked amazing!!! But of course  to rent all those would be sooooo expensive. So I found this chair at the Salvation Army for $10....and then I found out it was half off day at The Salvation (I didn't know that they had sales at thrift stores but they do...score for me :)). So I got my chair for $5. And here it is.....
 Now don't judge me....this chair has great bones!! I really liked the carving on the back of the chair and the legs. It has potential!! This was me first refinishing furniture project so any tips or comments you have are greatly appreciated.
How to Make This Chair a Masterpiece Bridal Bargainista Style
Supplies
-Screwdriver
-Paint Stripper
-Gloves
-Scrapers
-Old Rag
-Sandpaper
-Base Coat Spray Paint
-Spray Paint (I user Krylon it seems to go on the smoothest)
-Top Clear Protective coat (The indoor/outdoor kind puts a great seal on it)
-Staple gun and staples
-Material for the seat cover
-Padding to replace the top layer of padding on the chair

Now you are ready to start
1. First flip the chair over to unscrew the seat part of the chair from the rest of the chair. Once you have done that the chair will look like this...
2. Now you are ready to start stripping. This chair had a glossy finish over the stain that had to be removed. I sprayed on the paint stripper and let it sit for about 15 minutes and then it easily came off with the scraper and the old rag. The old rag came in handy for the round parts of the legs and the small crevices in the carvings. It is best to do this in small portions. This will help it not feel quite as overwhelming!
3. After that you have striped the whole chair it is time to do a little sanding. Just some light sanding will help smooth out the wood and make the paint go on easier.
4. Now for the base coat. My biggest tip is to take your time and do lots of very thin coats. I rushed a little (I was so excited to see the finished product) that I got some drips that had to be sanded out later. The better the base coat the smoother your color will go on. Do at least 3-4 coats of the base.
5. Time to add color. I used white but you can use any color you want. Once again though keep the coats thin and do quite a few.
6. Now for the protective coat. An you are finished with the paint.
7. Take the seat and use a screwdriver to take out all the staples. This is a time consuming process but not really difficult.
Time to take the ugly off!
8. Once you take the fabric off take the top layer of padding off and replace it with the new padding. Staple the padding to the bottom of the seat. Make sure you stretch the padding when you put it on.
9. The next step is to cut the new fabric out by using the old fabric as a pattern. Once you have the fabric cut staple it on making sure you stretch it well. You want it to look tight at first...it will loosen up over time!
10. Now screw the seat back onto the chair and....
Tada!! This is it....my chair creation!! Now I have seating for 1 at the wedding!! I have my work cut out for me but I am hoping to put together enough cool, random but coordinating chairs for all my guests!!

Thanks for reading!
Love Ya,
EM

Time for a Challenge

Well friends...just a little update! I am spending the next 3 days on a whirlwind of home staging here in Utah. I flew in last night to help my Mom stage the first two of many homes for clients! I am so excited....shopping, decorating and painting!! It is an amazing feeling to transform a room into a beautiful space. So with that I will head back to the garage to paint some more and when I get home I will share lots of pictures, tips and info about what we did!!

Friday, May 6, 2011

A cross between Marilyn Monroe and Audrey Hepburn

So I have been having a hard time lately what direction to go in with my fashion in life and my wedding. It is funny how sometimes we know who we want to be and how we want to come across....but we lose sight of that and get stuck in a rut! Well today I decided I am over being in a rut!!

As I was contemplating what I feel is my true style I figured out it is a cross between Audrey Hepburn and Marilyn Monroe. I am pretty reserved and classic most of the time but I like a little sparkle and pazzazz in there to make me shine!!

As for the wedding I think my plans and ideas are the perfect cross between the two. I was very inspired by the Royal Wedding. Mt mom is on board to sew my dress and I have taken a lot of inspiration for the design from Kate Middletons dresses!! Well that is all for today...short and sweet!!